“Shape Data” window
Used to manipulate data and text associated with shapes. Most text in my stencils is actually “data”, not just “text” and should not be edited directly as “text”, use shape data instead to change data and displayed text will change accordingly
- Visio 2016: View – Task Panes – Shape Data
- Clicking a shape will show shape data in this window and data can be modified, either by editing text fields or with pull-down menus (most of my stencils use pull-down menus)

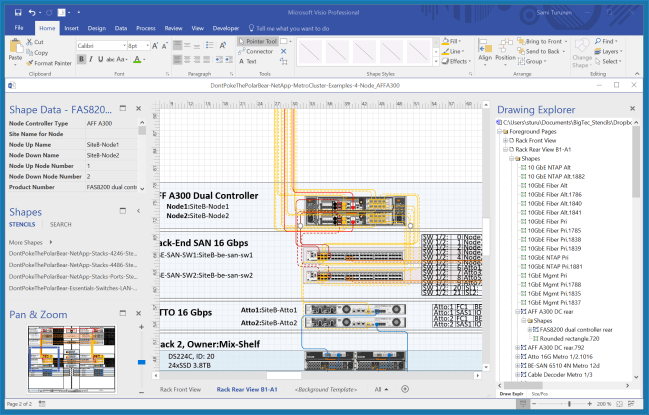
- Example of shape data in action

- Controller shape is selected in main drawing area (white circles either side of shape)
- Shape Data Window shows data associated with the shape
- Node Controller Type
- Site Name for Node
- Node Up Name
- Node Down Name
- Etc
- Pull-down menu for “Node Up Number” is open and first item “1” on the list is selected
- To change the node number for the shape, just select different item from pull-down menu
- The description of the shape (not shown in the example) will change accordingly
“Size & Position” window
Can be used to size and position shapes by altering numerical values, rather than using shape handles
Can also be used to roughly estimate length of cables
- Select a cable and cable length is shown in Size & Position
- Default unit is inches, either multiply value by 2.54 to get cm
- Or
- Temporarily change page units to centimeters
- Page Setup – Page Properties – Measurement Units
- Measured length isn’t 1=1 with real world where cables run in three dimensions and some slack is required
- Visio 2016: View – Task Panes – Size & Position

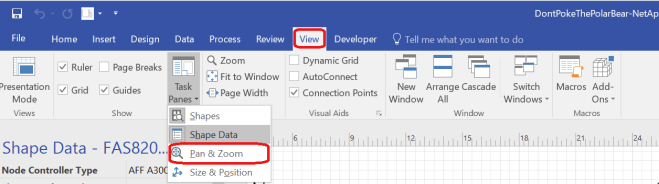
“Pan & Zoom” window
Makes navigating within page easier especially at higher zoom levels, like 400% 800%
- Visio 2016: View – Task Panes – Pan & Zoom
“Drawing Explorer” window
In complex Drawings “Drawing Explorer” can be helpful in navigating and selecting shapes.
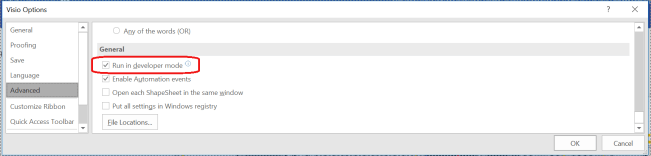
- Enable “Developer Mode”
- File – Options – Advanced – Run in developer mode
- This enables “Developer” Tab
- Requires Pro license for Visio

Example: Drawing Explorer in action
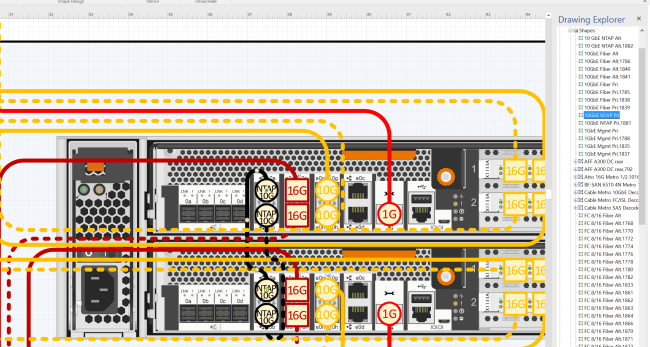
- With “busy” drawings that have many shapes it is sometimes hard select shapes, it might take few clicks and it might even feel next to impossible task to select the right one. Sometimes it is faster to use “Drawing Explorer” to select objects
- In example above I’ve used “Drawing Explorer” to select one of cluster interconnect cables (Black Cable with “NTAP 10G” text) on a very “busy” part of the drawing.
- When shape is selected you can manipulate the shape by moving it round or change it’s properties in “Shape Data” window or just delete it if it necessary
- Having meaningful names for shapes helps with navigating, sometimes you see that shape developer has taken short cuts and especially subshapes are named like “shape1,shape2 , shape3 and so on. Drawing Explorer can be also used to rename shapes if required
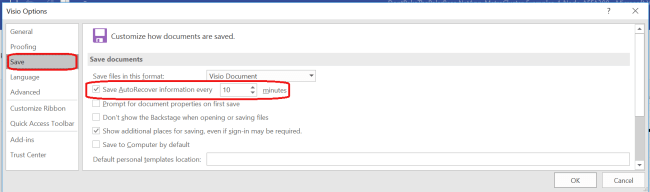
Enable AutoRecover to avoid loosing possibly hours of work
In complex drawings Visio sometimes “hangs” while waiting for your response, but you can’t find the window where you are supposed to answer
- Done-that-been-there-no-t-shirt 🙂
- Only way to recover is to kill your Visio session from Task Manager
- Non-saved work will be lost!!!
- More problem with earlier versions of Visio, haven’t had many “hangs” with Visio 2016
- File – Options -Save – Save Autorecover Information every XX minutes
Window layout & position
- Additional windows like “Shape Data” can hover over the main drawing area or can be pulled to separate sections of the page
- I am using setup where I have:
- Shape Data, Shapes and Pan & Zoom on the left side of the main drawing are
- Main Drawing area in the middle
- Drawing explorer on the right side of the main drawing area
- Size/Pos is a “tab”
- You can switch between “Drawing Explorer” and “Size/Pos” by changing active “tab”
- See Example below
My Visio window Setup
Use F2 key for editing text boxes
- Click/highlight shape to select it
- Shape Data window info can be used to verify that you are trying to edit correct shape
- Hit F2 key to edit
- Much easier than double clicking, which does not work all the time
- Keep in mind that you should not edit text boxes with DPTPB-Essentials, instead use “Shape Data” window to change data and text box will change accordingly, most of the time at least
Copy / Paste within Visio Page
- Standard Ctrl-C / Ctrl –V combination is hard to use with Visio as copied shape is pasted in some pseudo random location within the page
- Instead click/highlight a shape and keep “Ctrl” button pressed down
- A “+” sign appears
- Drag new shape in desired position and release “Ctrl” button
- Voila, you have a new copy of the original shape
- Much, much faster way to copy stuff
Copy & Paste to other applications
- Instead of Ctrl-c / Ctrl-v / copy & paste
- Results are fuzzy
- Use Ctrl-c / Copy and Paste Special “Picture (Enhanced Metafile)”
- Results in smaller file size
- Geometry keeps full level of detail
- Pasted object behaves like picture object for moving and scaling
Sending Finished Drawings
- Visio is quite expensive product and not part of the standard Office package
- Recipient might not be able to open Visio files
- While there is free Visio Viewer available
- Requires downloading and installing
- Adobe PDF-format is much easier
- Adobe reader is widely used
- Save drawings as PDF-files
- Objects within PDF behave like pictures and can be scaled and viewed in zoomed mode
- Do not use JPG / PNG / GIF files
- Crappy quality and picture doesn’t scale/zoom well
- Update Apr 24,2017
- There are some issues with Visio native “Save as PDF” feature
- Better to use CutePDF “Print as PDF”
- More info in my blog post: CutePDF vs Save as PDF in Visio
Making drawings without cabling
-
- Use only placeholder shapes
- Visio by DPTPB: Not Running Cables in Drawings?
Suggested Workflow
- If possible, copy and modify existing drawing, much less work
- If suitable drawing does not exist, use DPTPB Essentials template(s)
- Scale and other properties are set correctly to work with stencils
- Do NOT use visio “Blank” template, it is not in scale and will not work with my stencils
- Start with front view and carefully examine that everything is all right before proceeding to Rear View
- Rear view is more complex and changing it will take more time
- Before starting to run cables for rear view carefully verify work your so far, changing cabling is the most time-consuming part
- Sometimes it is better to review drawing with customer before running cables
- Sometimes rear view without cables is sufficient, just assign correct ports in port assignment boxes

You must be logged in to post a comment.