Disk shelf SAS cabling can be quite complex, especially when using multiple controllers, disk shelves and/or disk stacks. While you might get working solution by using ad-hoc cabling sequence and doing it differently every time, it is highly recommend to use consistent methods when planning,documenting and running the cables (both in drawings and with the actual cables in real world).
By using consistent method for cabling:
- Avoid downtime caused by faulty cabling
- Cabling is easier understand (and service) by someone else
- NetApp configuration check tools like MyAutoSupport wont raise alerts and cause unnecessary fuss
- In case of problems NetApp support can sometimes ask you to use best practice cabling as requirement for further support actions, even when cabling is not the root-cause of the problem. Unfortunately they sometimes “hide behind” or “avoid” work with excuses like this.
To make this complex issue easier to understand and document I’ve chosen to use more extensive coding with SAS cables and I am using multiple colors (unlike with other cable types where only one color is used per cable type and all nodes use same color cables).
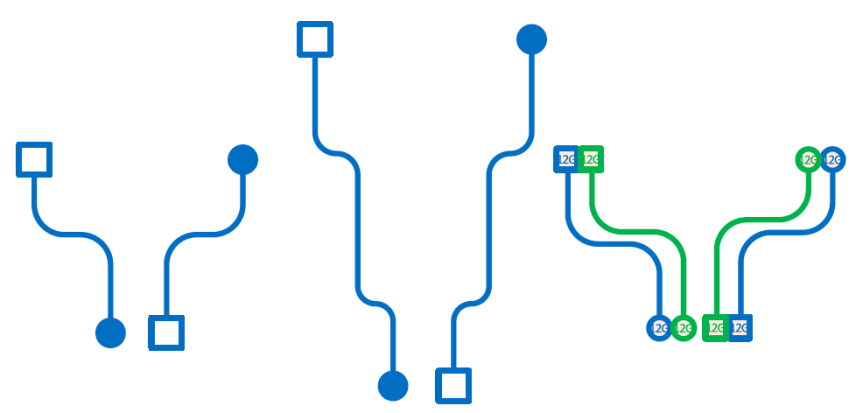
Node1 SAS Cables
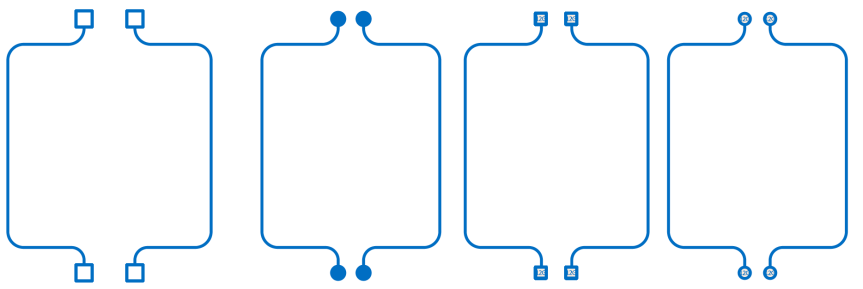
- Node1 and other odd-numbered nodes
- Dark blue color
- Square cable ends
- Connects to
- Controller ports a/c
- IOMA “Square” ports or “1” ports
- Connects to
- Circle cable ends
- Connects to
- Controller ports b/d
- IOMB “Circle” ports or “3” ports
- Connects to
- Square cable ends
- Separate shape for 12 Gbps
- “12G” text within cable end
- smaller cable end shapes to better fit smaller MiniSAS HD ports
- Different naming convention
- 12Gbps cable names start with SAS12
- 6 Gbps cable names start with SAS
- No point of using square or circle with 12Gbps SAS cable shape names as the connection point in shelf IOM module ports are now labeled with number
- Left-handed (L) and Right-handed (R) variants
Picture: Node1 SAS 6Gbps & 12Gbps Cables in Shapes Window


Node2 SAS cables
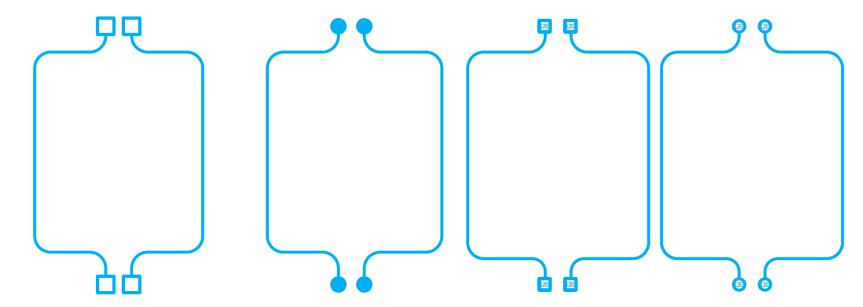
- Node2 and other even-numbered nodes
- Light Blue Color
- Cable with square ends connects to IOMB “Square” or “1” ports
- Cable with circle ends connects to IOMA “Circle” or “3” ports
- Otherwise same as Node1 cables
Picture: Node2 SAS 6Gbps & 12Gbps Cables in Shapes Window


Node 1 SAS Quad-Path HA cables
- With Quad-Path cabling you will have double-wide or dual SAS cabling running between controller and shelf IOMA/IOMB modules
- Quad Path cabling provides four SAS paths from controller to shelf, Dual Path cabling provides two paths from controller
- We could use the same cable shapes as with Dual-Path HA, but it would result in harder to read drawings
- So I decided to make different cables for additional cables required by Quad-Path HA
- Node1 and other odd-numbered nodes
- Dark Green
- Only 12G version as 6Gbps version cannot use Quad-Path cabling
- Cable with square ends connects to IOMA “2” ports
- Cable with circle ends connects to IOMB “4” ports
Node 2 SAS Quad-Path HA cables
- Node2 and other even-numbered nodes
- Light Green Color
- Only 12Gbps version as 6Gbps version cannot use Quad-Path cabling
- Cable with square ends connects to IOMB “2” ports
- Cable with circle ends connects to IOMA “4” ports
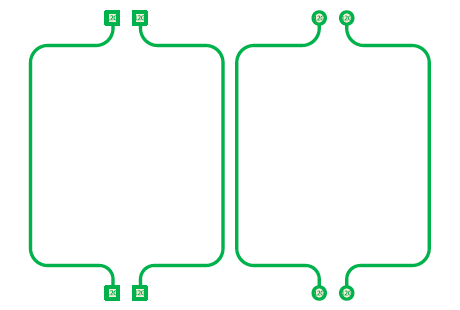
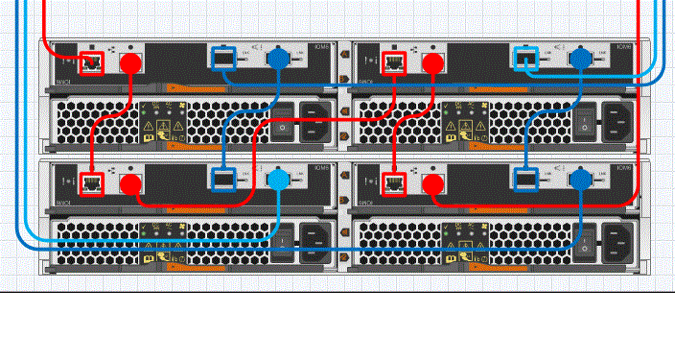
SAS cables within SAS stacks
- There is no concept of “In” and “Out” ports with SAS cabling, controller can access disk either trough IOMA or IOMB
- Shelves can also have mixed ownership where a single shelf has disks owned by two controllers
- So, no point of color coding node ownership for SAS cables running between shelves
- Dark Blue color for Dual Path HA cables
- Dark Green color for Quad Path HA cables (12Gpbs only)
- No light Blue / Green cables
- Square cable end = connect to IOMx “Square” or “1” port
- Circle cable end = connect to IOMx “Circle” or “3” port
- DS2246 & DS4246 SAS cables
- Uses 6Gbps SAS cables
- DS4246 requires more legs to route neatly
- DS212C & DS224C SAS cables
- Uses 12Gbps SAS cables (with text “12G” within cable end shape)
- Up & Down variant
- Depending on direction of your SAS stack
- Up from controller or Down from controller
- These shelf-to-shelf SAS cable shapes are used in complete SAS stack shapes
- In ready-made stacks shelf-to-shelf SAS cabling is already in place, so typically you don’t have to run these cables
- Unless you want to make your own stack or modify existing stack
Picture: 6 Gbps & 12Gbps SAS shelf-to-shelf cables in Shapes Window


Updates:
- Visio by DPTPB: Transitional SAS cables 6Gbps-to-12Gbps
- Visio by DPTPB: Update notes 22.11.2016
SAS cabling instructions
- Assign Shelf IDs for stacks first, if not already done
- Double and Triple check that you have correct port assignment port boxes for each SAS stack
- Wrong port assignments = wrong cabling = remove cables = start over = major frustration …
- SAS port assignments are based on FAS / AFF model, number of stacks and stack number
- Make sure that you are running stacks in right direction
- Typically stacks below controller run downwards from controller, i.e. shelf id increases as you go down, use stack shapes with “down” in their name
- And stacks above controller run upward from controller, i.e. shelf id increases as you go up, use stack shapes with “up” in their name
- Cable one SAS stack at a time
- Start with Square ports, followed by Circle ports
- Space cables at 800% and snap to grid lines
- Run cables in pairs (dark blue/green & light blue/green)
- Leave one 800% grid width space between pairs
- Run cables on the side of controllers / disk shelves, not on top of controllers as this makes it hard to see the cables, specially dim colored cables
- Crossing cables is unavoidable
- Sometimes cable crossing can minimized by
- Entering shelf from top or bottom
- And/or running light blue cable to the left or right of dark blue cable
SAS Cabling Example – Square connections for Stack 1:

- Dark Blue cable with “Square” ends running from Node1 0a port to Stack1 IOMA “Square” port
- Light Blue cable with “Square” ends running from Node2 0a port to Stack1 IOMB “Square” port
- Spaced with one 800% grid column between cables
- Not running on top of the controller or disk shelf where possible
SAS Cabling Example – Circle connections for Stack 1:
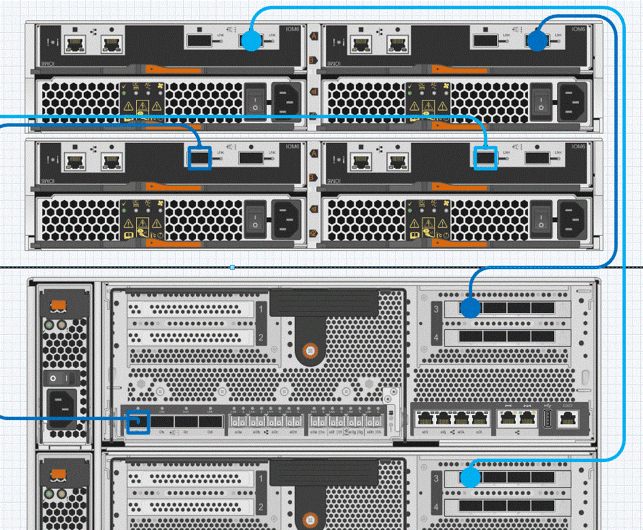
- Dark Blue cable with “Circle” ends running from Node1 3d port to Stack1 IOMB “Circle” port
- Light Blue cable with “Circle” ends running from Node2 3d port to Stack1 IOMA “Circle” port
- Spaced with one 800% grid column between cables
- Not running on top of the controller or disk shelf where possible
SAS Cabling Example – More complex with other cabling
Cabling drawings can get quite “busy”, so using a constant method for running the cables will help in reading and comprehending the drawing.
Visual cues in SAS cabling
Since original 6Gbps SAS ports on IOMA/IOMB modules were labeled with shapes “Square” and “Circle”, it gave opportunity to use matching shapes in cable ends. This way there was a visual cue where the cable should be connected.
Unfortunately new 12Gbps SAS ports are using different naming conventions for SAS port naming, no more “Square” or “Circle” ports, numbers “1”,”2″,”3″ and “4” are used as port names instead. Visual cues are self-explanatory with old-style 6Gbps SAS cabling . Using “Square” and “Circle” concept is still somewhat helpful with new 12Gbps ports and cabling, you just have to map ports “1” and “2” as “Square” and ports “3” and “4” as “Circle” ports.
Example Visual Cues:
Example: IOMA/IOMB ports with 6Gbps SAS Disk Shelfs ( DS2246/DS4246/DS4486)
- IOMA/IOMB ports are labeled with either “Square” or “Circle” shape
- Cable end shape should match IOMA/IOMB port label
- Example: cable end shapes match with port labels

Example: IOMA/IOMB ports with 12 Gbps SAS Disk Shelfs (DS212C/DS224C)
- IOMA/IOMB ports are labed with numbers instead “1”,”2,”3″,”4″
- No ACP cable makes drawing “cleaner”
- There is no visual cue where to connect the cable end
- I guess you win some, you loose some
- You have to map numbers to shapes
- Ports labeled with “1” and “2” are equivalent to “Square” ports
- Ports labeled with “3” and “4” are equivalent to “Circle” ports
- Example: Cable end shapes do NOT match with port labels

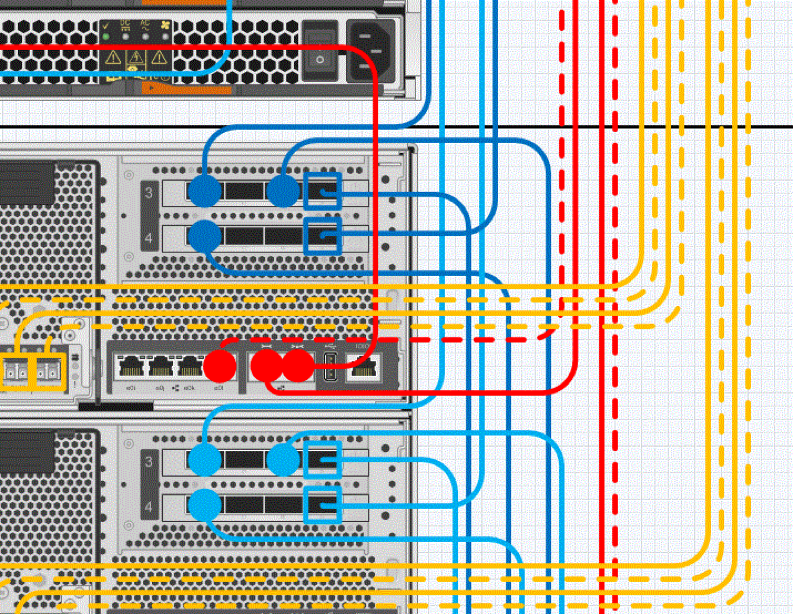
Example: Node1SAS adapter ports (Dual-Path HA cabling)


- All SAS cables should be dark blue, if not, you have wrong cable
- Motherboard ports and adapters in slots on the left side of the controller should have cable ends in following order
- Square end, Circle end, Square end, Circle end
- Left side of the picture above
- Adapters in slots on the right side of controller should have cable ends in following order
- Circle end, Square end, Circle end, Square end
- Right side of the picture above
- Node2SAS adapter ports (Dual-Path HA cabling)
- Same cues, but the cable should light blue
- Node1SAS adapter ports (Quad-Path HA cabling)
- Same cues, but the cable should be dark green
- Node2SAS adapter ports (Dual-Path HA cabling)
- Same cues, but the cable should be light green
SAS Cabling Quiz:
- Find errors in cabling, controller in question is node1

- Scroll down for answers
Answers for SAS cabling quiz:
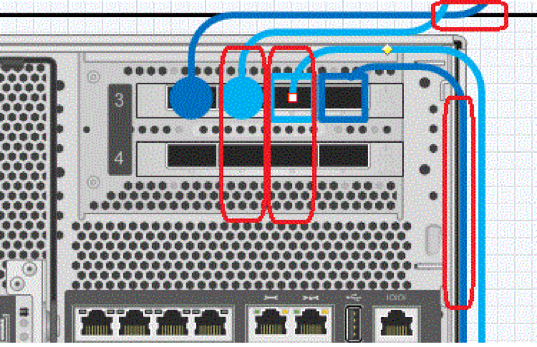
- Hard errors (against best practice):
- 1: circle cable end next to another circle cable end (3c port = cable with round end should only use ports b/d)
- 2: Light blue and Dark blue cables in the same adapter (3c and 3b ports, light blue cables are for Node2)
- 3: square cable end next to another square cable end (3b port = cable with square end should only use ports a/c)
- Soft errors (makes drawing hard to read)
- 4: cables leaving in top right corner are not spaced correctly
- 5: cables crossing unnecessarily in top right corner
- 6: dark blue cable running down is on top of controller, which makes it hard to see

You must be logged in to post a comment.